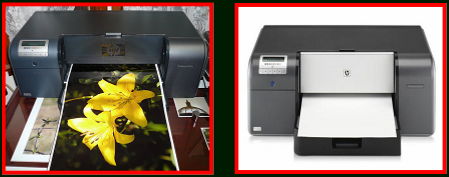
There are many reviews detailing every aspect of this printer and I won't go into it all here but how did it go for me? I will give you my initial experience and impressions.
The Fine Art Of Print Making
The process of print making remains and always will remain a fine art. From the beginning stages of processing a photo in a program like Photo Shop to the final matting and framing it all adds up to an artistic and technical endeavor. The B9180, for me, has made the printing process more successful and given me the comfort that my effort can be displayed, without a glass, for a very long time without significant worry about the print fading.
The First Three Weeks (notes on the HP B9180)
Many of the reviews raved about how easy and trouble free the installation went. Well to start off, with the good part, the printer arrived nicely packed in a generous box and the instructions were detailed and clear. But the rest of my installation did not go as smooth as most reviews had indicated.
To Swab or Not to Swab?
The initial setup of the printer requires removing a number of pieces of shipping tape and then installing the ink and print heads. It is in the installation of the print heads where there was a bit of confusion. The setup procedure indicated that there should be swabs packed with the heads. According to the setup guide you were supposed to use these swabs to wipe the heads off prior to installation. Look as I might, I could find no swabs anywhere. Fortunately HP has an online chat help option that is available 24 hrs. Since I was doing this installation at 11:00pm I decided to try the online chat. I did receive a quick connection and they did inform me that they no longer were putting swabs in the packages and I could bypass that part of the installation and simply open the packages and install the heads. The printer then instructs to load the supplied pack of paper and proceeded to the auto calibration.
Once I was over the issue of the swabs and the calibration was complete it was on to the driver installation. I installed the printer onto my upgraded Windows Vista laptop and here I ran into a small problem. I cannot say if the problem was with windows Vista or the HP driver or perhaps just a specific issue with my particular hardware. The problem with the driver installation came when trying to install the network portion of the driver. The installation would halt and I had to choose "Retry" three times before the installation finished. After this little glitch the rest went ok but I will say that the installation of the drivers and software is SLOW it took me over a half hour to install the software and start to print.
Three Highlight Features
Before I get to the printmaking let me highlight the B9180s most outstanding features. The most obvious is the new VIVera pigment ink from HP that claims 200+ years on certain papers. The second outstanding feature, that comes built into the HP B9180, is a built in LAN Network card which means that if you have a LAN in your home or office you can connect via Eathernet to the B91890 and have access to the printer from any network connected computer. This feature is often an option, if available at all, for extra cost. I especially find network support very advantageous because I work almost exclusively from a high powered laptop and often wirelessly. If my B9180 is plugged into the network I have the ability to print to it while maintaining the mobility of my laptop. And the third, most notable feature, is the auto Calibration. This is a process that is automatically initiated when setting up the printer for the first time and manually at any time the user desires. What does it do? Well, my understanding is that it set's the printer to a standard color output for color consistency by printing color targets and using built in Densitometric sensors to measure the actual color output and calibrate this to a predefined standard. This process is initiated after changing print heads (which are user changeable) and HP recommends executing the process "periodically"
Prints In The Making
With the printer setup and the software installed I was now ready to produce my first prints. I almost always print from Photoshop so I started by printing my first print direct from Photoshop. I chose initially not to use the supplied Photoshop plug-in (which I came later to find out is very handy) and print using my normal print routine like I do with my Canon I9900. I also opted to use "Printer Managed" color instead of the more sophisticated "Photoshop managed" option and the HP supplied profiles. This would give me an Idea how the printer would preform right out of the box in it's most basic and easy to use configuration. I made my first few prints on the supplied Hp Advanced Glossy paper. The prints were nice and quite neutral but also they were lacking the pop that I was used to from my I9900. They had fine resolution but I must say that visually they were a bit disappointing. So I started to experiment and adjust the print in Photoshop to produce a more similar match to the I9900. After a few prints I was able to make adjustments that would produce a very nice print. I did notice that shadow detail was better than anything I have been able to get from my I9900. Bear in mind that was just using the most basic print settings and letting the printer manage color.
A few frustrations
After the first few prints I began to experience a few problems that took me some time to iron out. The first thing I noticed is that if the printer paused during printing, for more than a few seconds, a visible overlap could be seen in the print where the printer had paused waiting for more data. This showed up as a slightly darker band in the print about 1/2" wide. With my Canon I9900, and other dye printers, I never noticed a problem in the output if the printer had to pause for more data and I would freely use the computer during printing. With the HP B9180, and I suspect other pigment printers, if the printer pauses long enough the dry ink and the fresh ink do not blend seamlessly. I found this to be the case across the board with any paper; however some papers were less noticeable. My conclusion on this issue is that you need to have a computer powerful enough to keep up with the data flow and minimize any background operations so that the print output does not get interrupted.
My next issue appears to be related to Windows Vista, the HP Vista driver and or my computer hardware. My laptop is a 1.7ghz Pentium with 1.5gb of ram and when I started to print out 13" 19" prints I found that if I sent the printer a print with a resolution greater than 280 PPI the print would get ejected from the printer with about 1/5th of the page un-printed. When trying to solve this issue I tried printing the same print from a Windows XP machine with 2gb of memory and had no problems. The good news is that, to the naked eye, it is very difficult to see any improvement in a 13x19 print between 184 PPI or 300 PPI. Again remember that this is just FYI and you should not draw any conclusions regarding this with respect to Vista machines. I only have tried this on my one Vista upgraded laptop and I did not have any trouble print from a Windows XP machine.
I also found it frustrating to try to cancel a print that had been sent to the printer. It seems that just trying to select cancel from the print manger did nothing nor did it seem to do anything if I pressed the cancel button on the printer itself except to eject the loaded page. The only thing that was effective in clearing the print queue was to go to the Windows services manager and find the "print spooler" and start and stop the service and repeatedly press cancel in the print status dialog box.
Great Prints!
Finally after working thru and understanding a few of the idiosyncrasies of the B9180 I started to get down to the business of just producing prints. HP includes with the printer a Photoshop Plug-in that makes it easy to use Photoshop managed color along with the included HP profiles. Here is where the B9180 began to realy show it's colors. My first print using the Hp profile was outstanding. Color was very neutral and balanced and shadow detail was excellent. I soon was able to produce prints quickly and to my taste with just one proofing print and then the final print. I would still say that the Canon I9900 has a bit more pop however the prints from the HP are more consistently color correct and neutrally balanced where the I9900 tends to exaggerate colors especially in the reds. I do have to correct prints upward in saturation and contrast somewhat to avoid a flat print coming from the HP but I would much prefer to do this than to have prints come out over done. The Photoshop plug-in makes it very easy to use profiles and set the correct printer settings which can be a little obscure when going through the standard Photoshop dialog boxes.


